
What Makes the Perfect Sprinter Van Conversion Layout For Van Life?
What Makes the Perfect Sprinter Van Conversion Layout For Van Life?
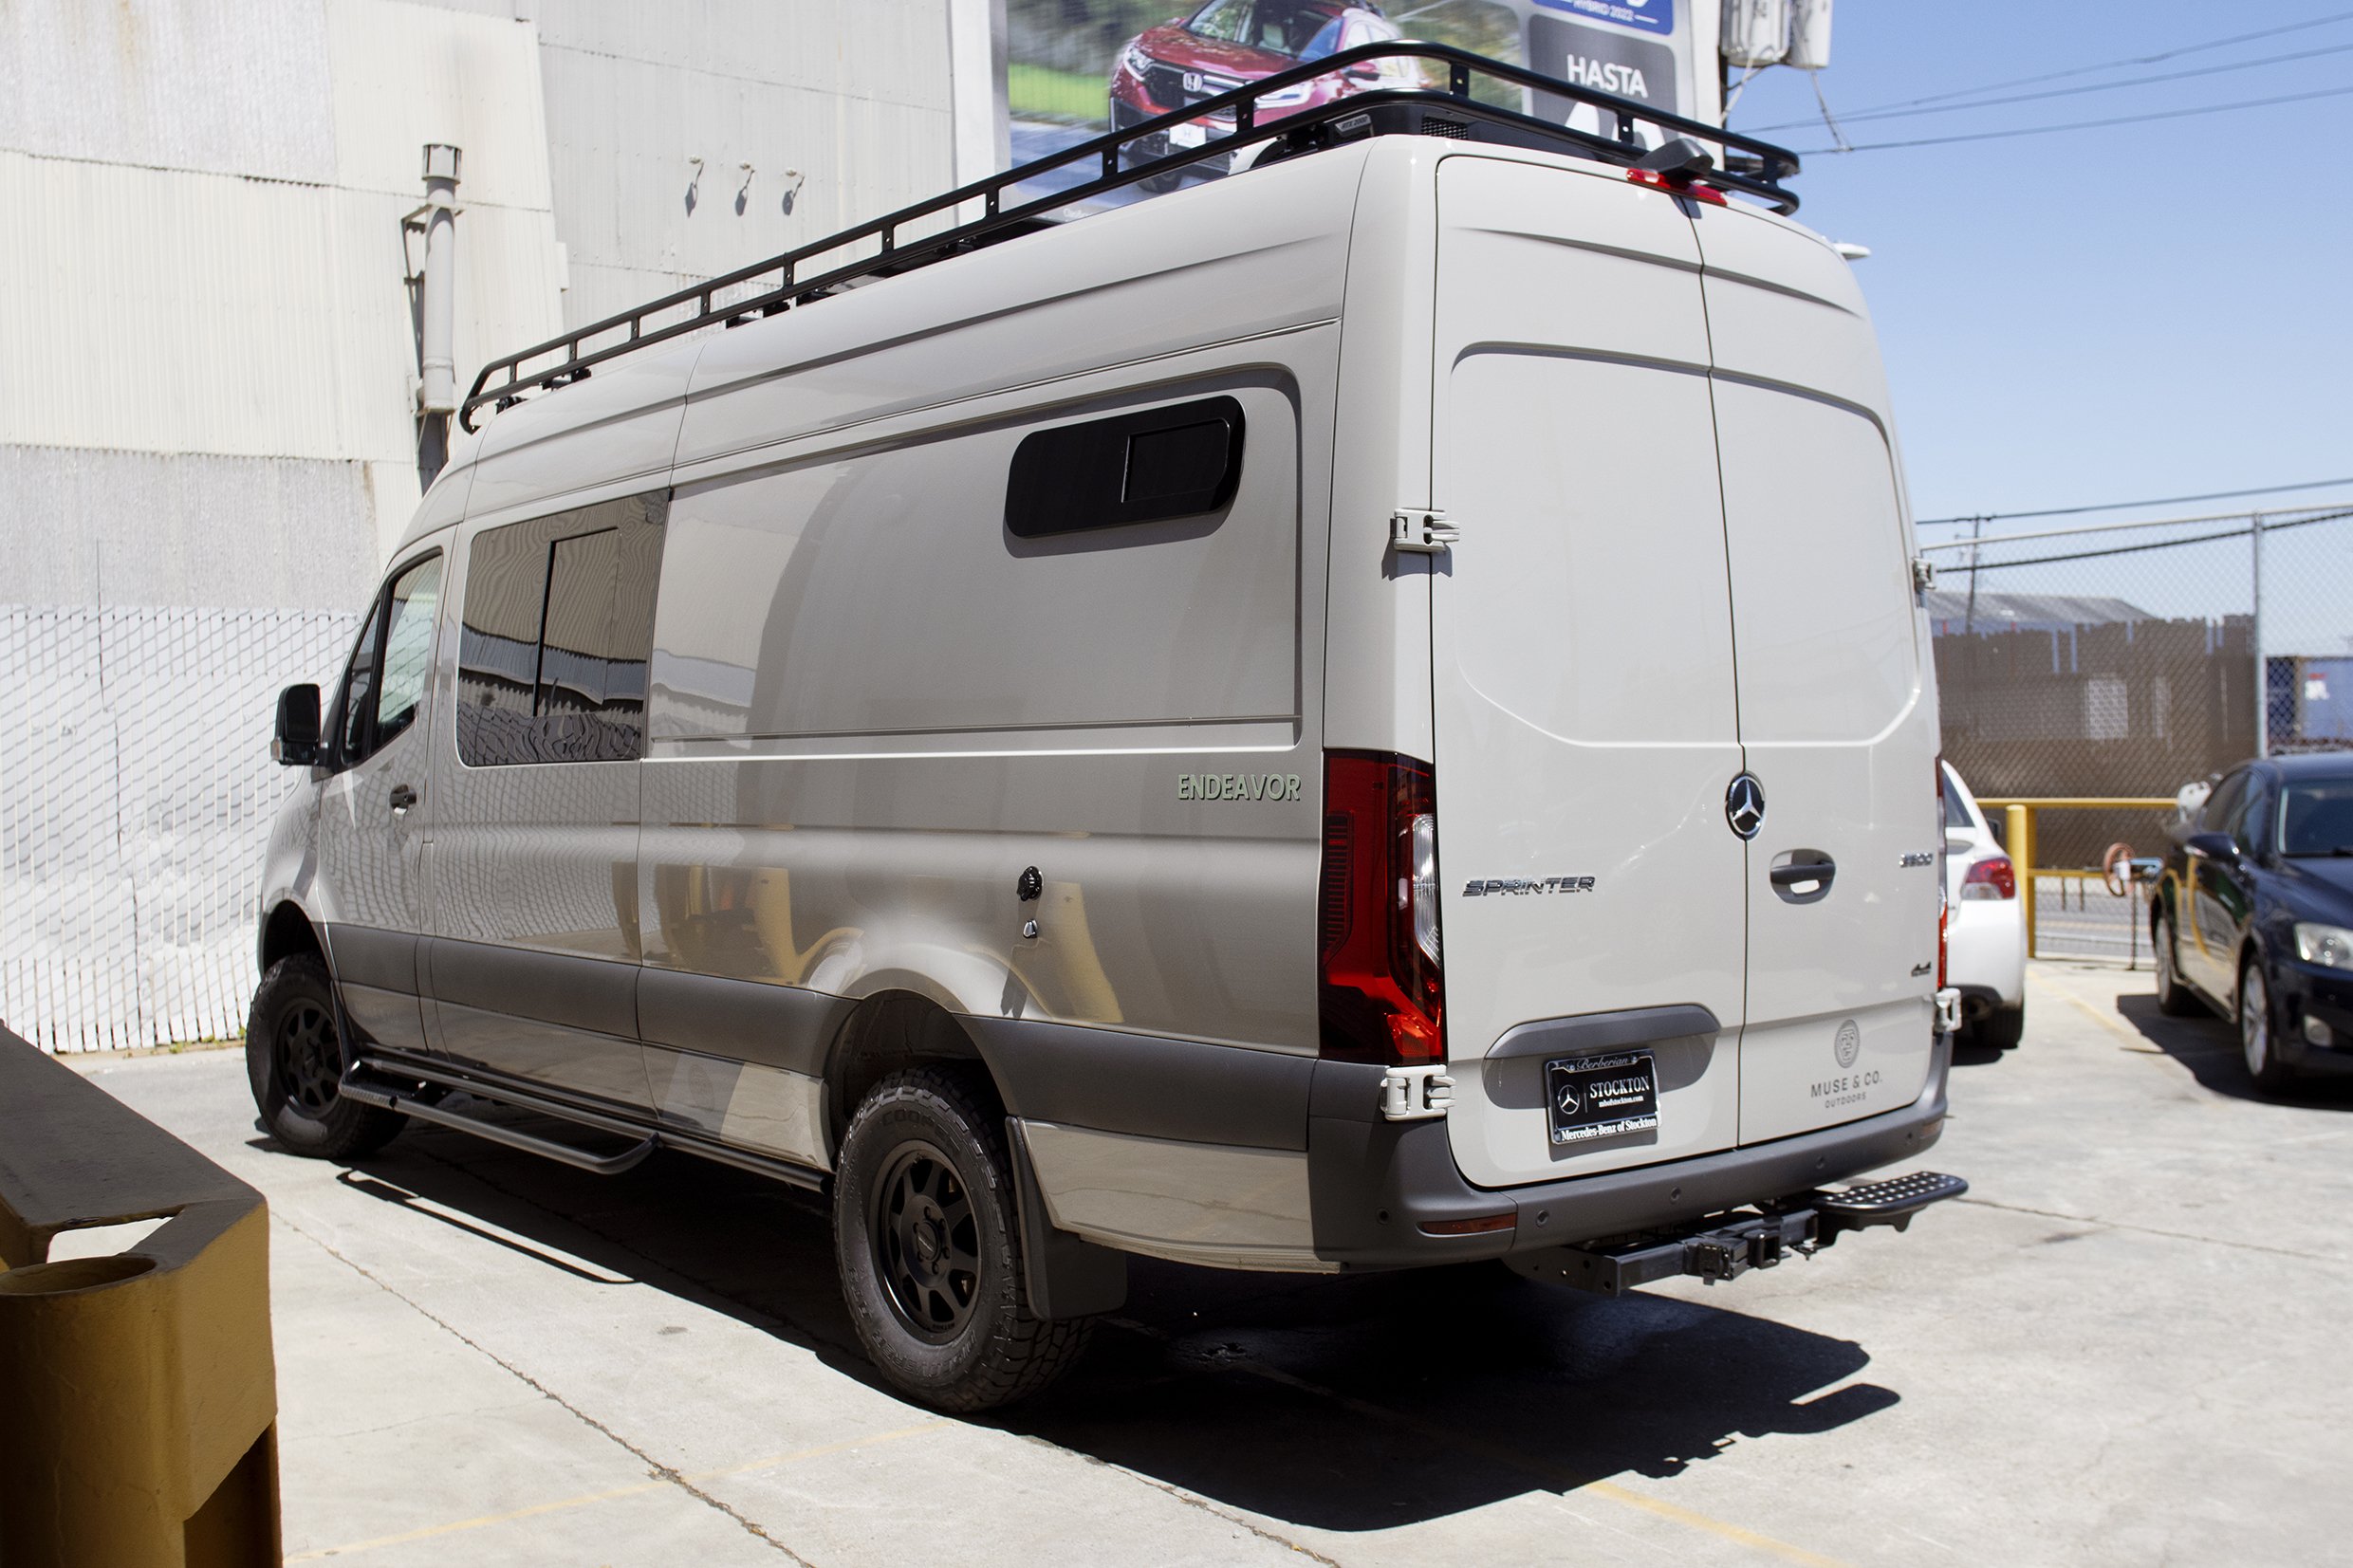
Photo credit: Muse & Co. Outdoors
If you are in the market for a Sprinter van conversion, then you have probably noticed that there are literally hundreds of camper van layouts out there.
Choosing the right layout for your camper van conversion is important. Camper vans offer a lot in a small space, but the right floor plan can make the difference between a cramped, RV-like feel or a bright and open van lifer’s dream rig.
You also need to consider your needs: Are you going to be living full-time van life or just taking your van out for weekend road trips?
Whether you are starting your own DIY custom build on your own van, or looking for the best campervan conversion companies, this guide can help you figure out what floor plan you need to maximize the functionality and vibe of your van’s living area.
Major Components of Camper Van Layouts
While camper van layouts vary a lot, most have the same basic components that comprise the majority of the living space.
The orientation and design of these components will determine how your van’s floor plan functions and feels.
Van builders that thoughtfully design and orient the following components will have the best layouts.
Kitchen
Kitchens tend to take center stage in van designs. Having a fridge, sink, stovetop, and plenty of counter space is a big part of what separates camping in a van from car camping.
Kitchens take up a lot of space, and there are a few different orientations that can really change the feel of a Sprinter camper van layout.
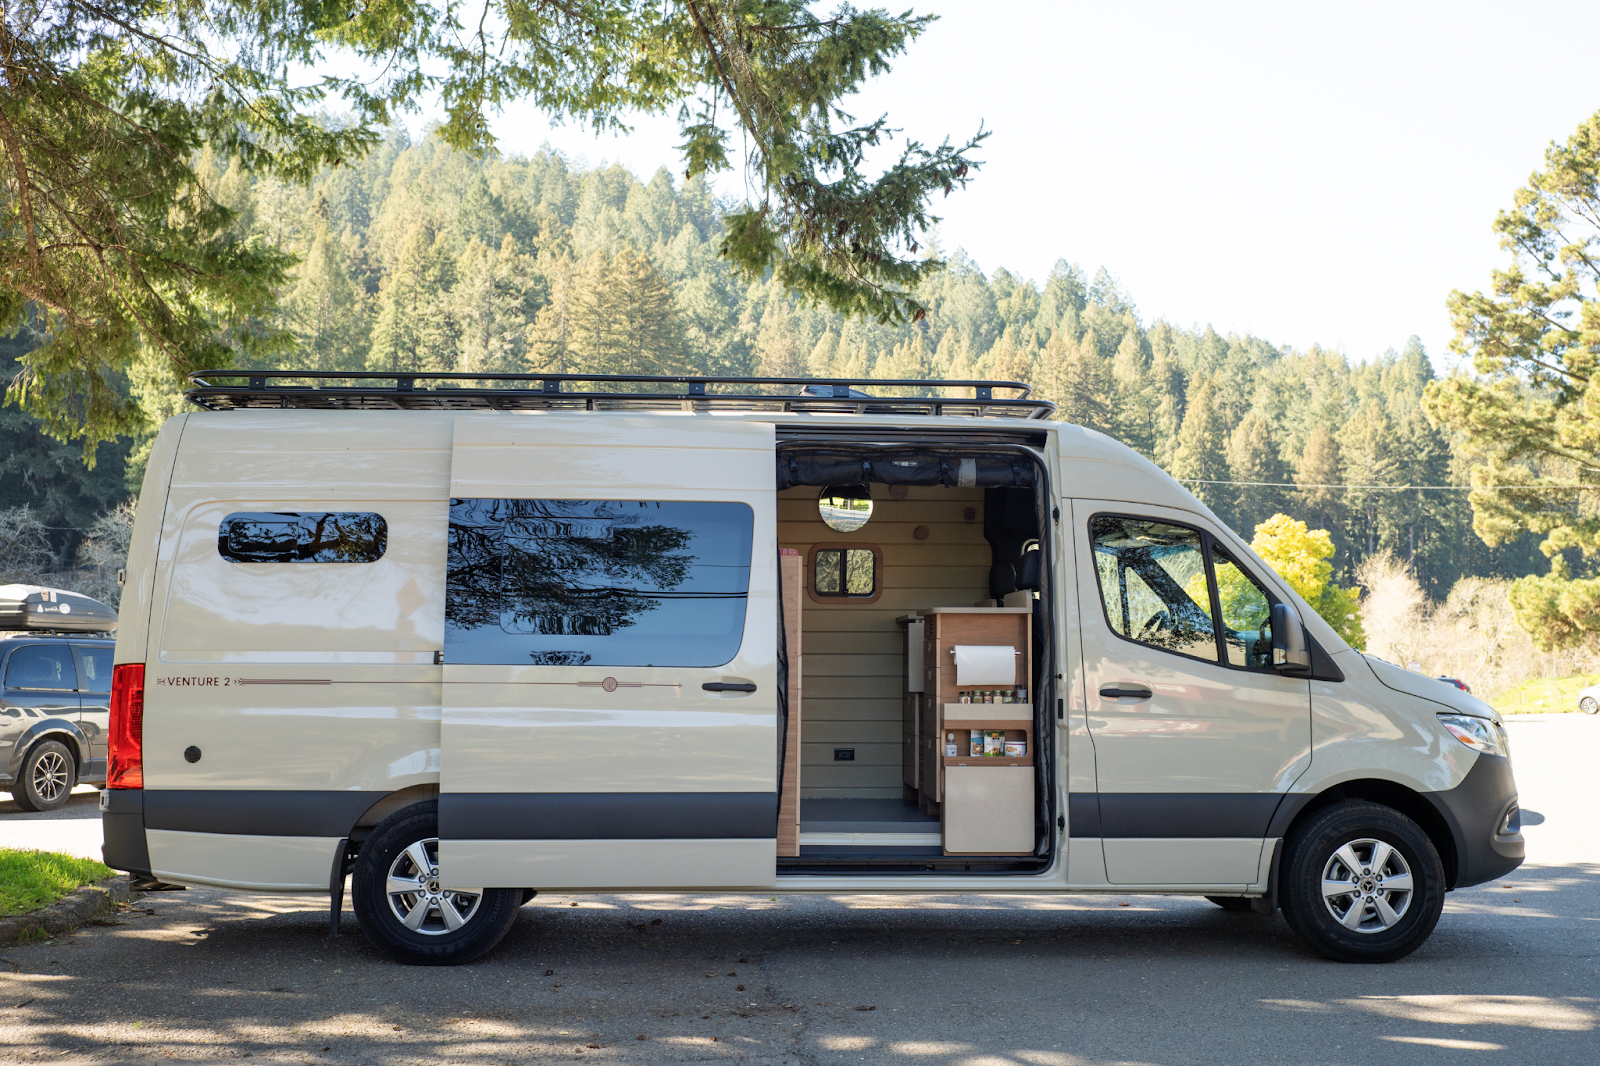
The most common camper van design is to put the kitchen along the driver’s side wall, opposite the sliding door. With a bed in the back of the van, the kitchen runs between the bed and the front seats.
This option is great because it leaves about 3/4 to 2/3 of the width of the van open on the passenger side.
Another common kitchen design is to split the area into two cabinets, with one in the same orientation on the driver’s side and another on the passenger side, partially blocking the sliding door.
This design can make a van interior feel a bit more cramped, but there’s usually still plenty of room and you get the added bonus of being able to do dishes or cook a meal with an open-air feeling while looking out the sliding door.
The third option is to place the kitchen towards the front of the living area in an east-west orientation behind the front seats.
This option leaves the entire area between the kitchen and the bed open, expanding the possibilities for bench seats and other ideas.
The downside with this kitchen design is that it blocks passage between the front and rear of the van, although some builders leave the middle of the galley open with a fold-down countertop to address this issue.
Bed
The bed takes up the most space of any aspect of a camper van build. People get quite creative with their bed designs, utilizing things like bunk beds, convertible beds that fold into seats, and more.
Side-to-Side or Front-to-Back Bed?
Whether to orient the bed front to back or side to side is an inevitable camper van layout question.
With a front-back orientation, it is possible to fit a queen size bed in a Mercedes Sprinter or Ford Transit, and it’s not unheard of to see king beds in camper conversions.
The east-west orientation, on the other hand, has the major benefit of leaving more living space available in front of it. This type of bed is better for high-roof vans with shorter wheelbases, such as the Sprinter 144.
One way to avoid feeling too cramped with an east-west bed is to add flare-outs to the sides of the van. These literally make the body of the van wider in the area of the bed to allow for more sleeping room.
Fixed vs. Convertible Beds
While convertible beds that pull out or convert to a seating area seem like a great idea for such a small space, we find that they end up being far less practical than fixed beds.
Convertible beds eat up storage space, while fixed beds allow for massive amounts of storage underneath them.
Additionally, it’s a pain to remove mattress toppers and bedding every time you go to convert your bed into seating, and there’s not exactly a great place to store these items in a van.
Additional Seating/Sleeping Areas
Many vans are meant for families and people traveling with more than two people. These vans tend to include rear bench seats.
The most common way to accommodate additional people for sleeping is to allow for the bench seats to fold down to create another bed.
There are other options, like adding a pop-top to your van with a full bed above the living area and a ladder to access it. But for kids who aren’t too picky about where they sleep, a simple convertible bench seat does the trick.
Storage Space
Having lots of storage is critical to making a camper van functional and keeping the living space from feeling cluttered.
Overhead cabinets are one common storage solution for vans, providing a great place to store clothes, food, and other items.
Box seats serve the dual purpose of providing seating while also holding large items. It is common to store a cassette or composting toilet in a slide-out cabinet under a seating area.
The bulk of the storage in a van is usually found in the “garage” area, under the bed in the rear of the van.
The garage is usually accessed through the rear doors and is a great place for all your outdoor gear and large items like mountain bikes.
The garage is also commonly where a van’s electrical system and water tanks are hidden away. These components are a great way to fill up the awkward area around the van’s wheel wells.
Van owners that need even more storage space can add a roof rack with a cargo box. Roof racks are also great for mounting awnings, LED lights, solar panels, and other accessories.
Finding Your Perfect Van Build Floor Plan
Are you in the market for a Sprinter conversion with a perfect layout? Forget the stress of designing your own floor plan and go with a professional conversion company with decades of experience designing and building small spaces.
Muse & Co. Outdoors is one of the best camper van conversion companies in California. With three models to choose from, you can pick the layout that is perfect for your needs.
Muse & Co. Outdoors offers semi-custom van conversions, meaning we handle the heavy lifting of designing the perfect layout but we still give you control over many aspects and features of your build.
Learn more about our vans here or try our Build My Van tool to explore your options and get a feel for what your dream rig could look like!
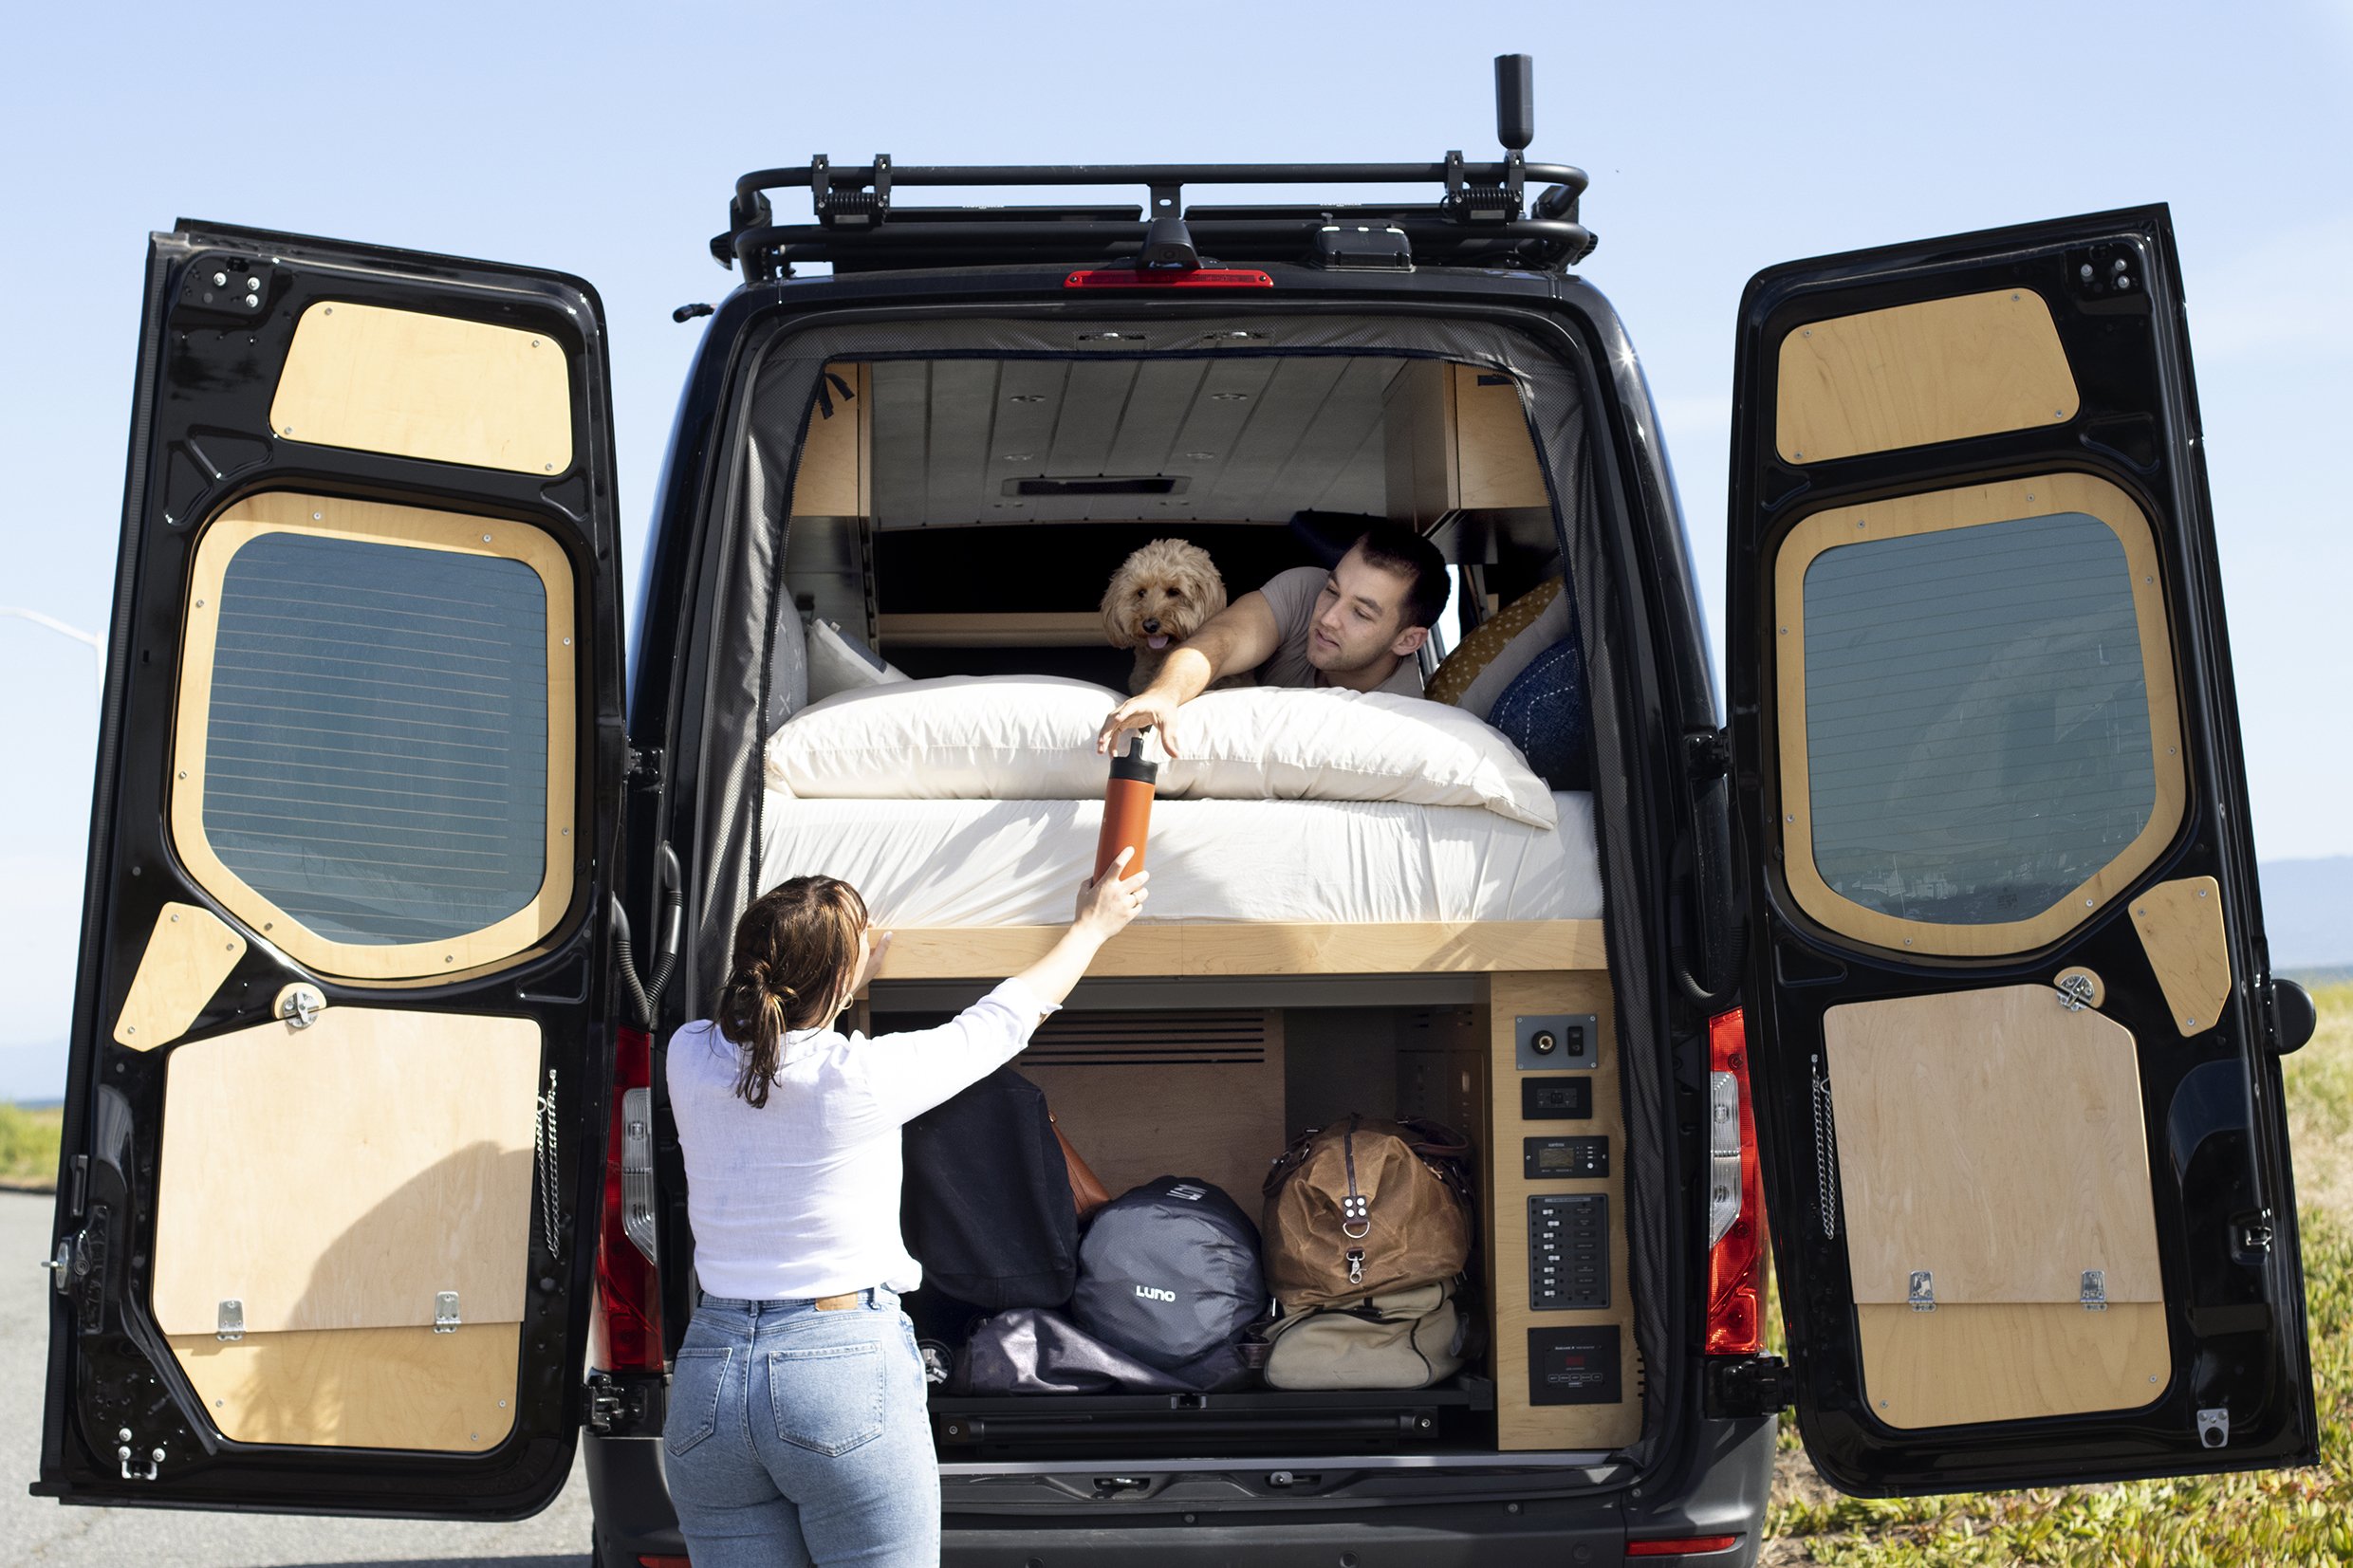
Photo Credit: Muse & Co. Outdoors
Van Life With a Dog: Road Trip Tips for Dog-Friendly Campervan Travel
Photo credit: Muse & Co. Outdoors
Van life with dogs can be great, but it also comes with its challenges. You’d do anything for your furry friends, so naturally, you want to take them with you on your camper van road trips.
It’s totally possible to travel comfortably in a van with your dog, but the more prepared you are, the happier you and your best friend will be.
Some van dwellers live full-time in their vans with their pups. Knowing where to camp, how to set up your van, and what to bring can be very helpful if you plan on taking camper van road trips with your dog.
Keep reading to learn our top tips on traveling in a van with your dog!
Where to Camp With a Dog in Your Van
You might love camping with your dog, but that doesn’t mean everyone else will welcome your pup. Dog owners need to have a good understanding of where their dogs are and are not allowed to be.
Camping in National Parks With a Dog
National parks have strict restrictions when it comes to dogs. Most parks do not allow dogs out of paved areas and campgrounds, and dogs are almost always required to be on a leash within park boundaries.
While it’s not impossible to enjoy a trip to a national park with your dog, you will probably have to make some compromises on what activities you plan on doing, since dogs aren’t allowed in most areas or on most trails within national parks.
If the weather is cool, you may be able to leave your dog in your van safely for a few hours. As long as you can keep your dog cool and they have access to a water bowl, they should be okay for a short period of time in the van.
Of course, if you plan on leaving your dog in the van for more than a few minutes, make sure to turn on the vent fan, put up window covers, and park in the shade. Never leave your dog in the van on hot days.
Dispersed Camping With a Dog
Dispersed camping, or camping outside of an established campground, is allowed on many public lands, including BLM land and in most national forests.
Dispersed camping in a van is a great way to get away from the hustle and bustle of campgrounds and enjoy some secluded time in nature.
It’s also an ideal way to camp if you are bringing your dog along, as most areas where dispersed camping is allowed are great for letting your dog off-leash.
After long drives, there’s no doubt that your pup will want to get out of the small space of the van and move his legs a bit. Camping in a remote area allows your dog to roam free and enjoy himself.
Camping in RV Parks and Campgrounds With a Dog
Many RV parks and campgrounds allow dogs. Restrictions vary with each campground, so be sure to double-check before making a reservation.
Most RV parks and campgrounds require dogs to be on a leash, though particularly dog-friendly ones may have a dog park or a large fenced-in kennel where you can let your pup off-leash.
Top 5 Essentials for Van Life With a Dog
Knowing where to camp is an important piece of van life with a dog, but it’s not everything. Having the right gear can make a world of difference, too. Below you’ll find a list of the top 5 van life essentials that we can’t live without when traveling with our pups:
Indoor/Outdoor Dog Bed
A dog bed is a must when van camping with your pup. Your dog needs a comfortable place to rest and you need to keep him off your bed to avoid too much hair and dirt making its way under the covers.
We recommend bringing a dog bed that is designed to be used outdoors and can be easily shaken off. When parked at a campsite, it’s nice for your dog to have somewhere comfortable to lay down outside the van. Using the same bed when it’s nighttime saves space.
Sealable Dog Bowls
Sprinter van owners move around a lot. Whether taking pit stops in the middle of long car rides or camping at a new spot every night, the ability to pack up and go quickly is part of what makes van life so appealing.
Your dog food and water bowls should be able to quickly pack up and go just like the rest of your van’s gear. Using bowls that are easily sealable avoids mess while traveling and makes packing up a breeze.
Extra Long Leash
Sometimes you’ll find yourself in areas with plenty of space for your pup to roam, but not enough to let him off leash.
Whether you’re in a campground with a leash requirement or at a nice spot that’s a bit too close to the road, having an extra long leash can give you peace of mind and keep your dog safe while allowing him to explore.
Handheld Vacuum
Anyone who has spent time in a campervan knows how quickly things can get messy. In such a small space, dirt builds up quickly on the floor and in nooks and crannies.
Add a dog to the equation, and the mess gets exponentially worse. A rechargeable handheld vacuum is a great way to keep the dog hair at bay.
Seat Covers
If your dogs like to hang out on the front seats, seat covers are a must to protect the fabric and make cleaning the van easier.
Waterproof and washable seat covers are great for handling the mess of dogs, and they’re especially necessary if you let your pup ride in the passenger seat.
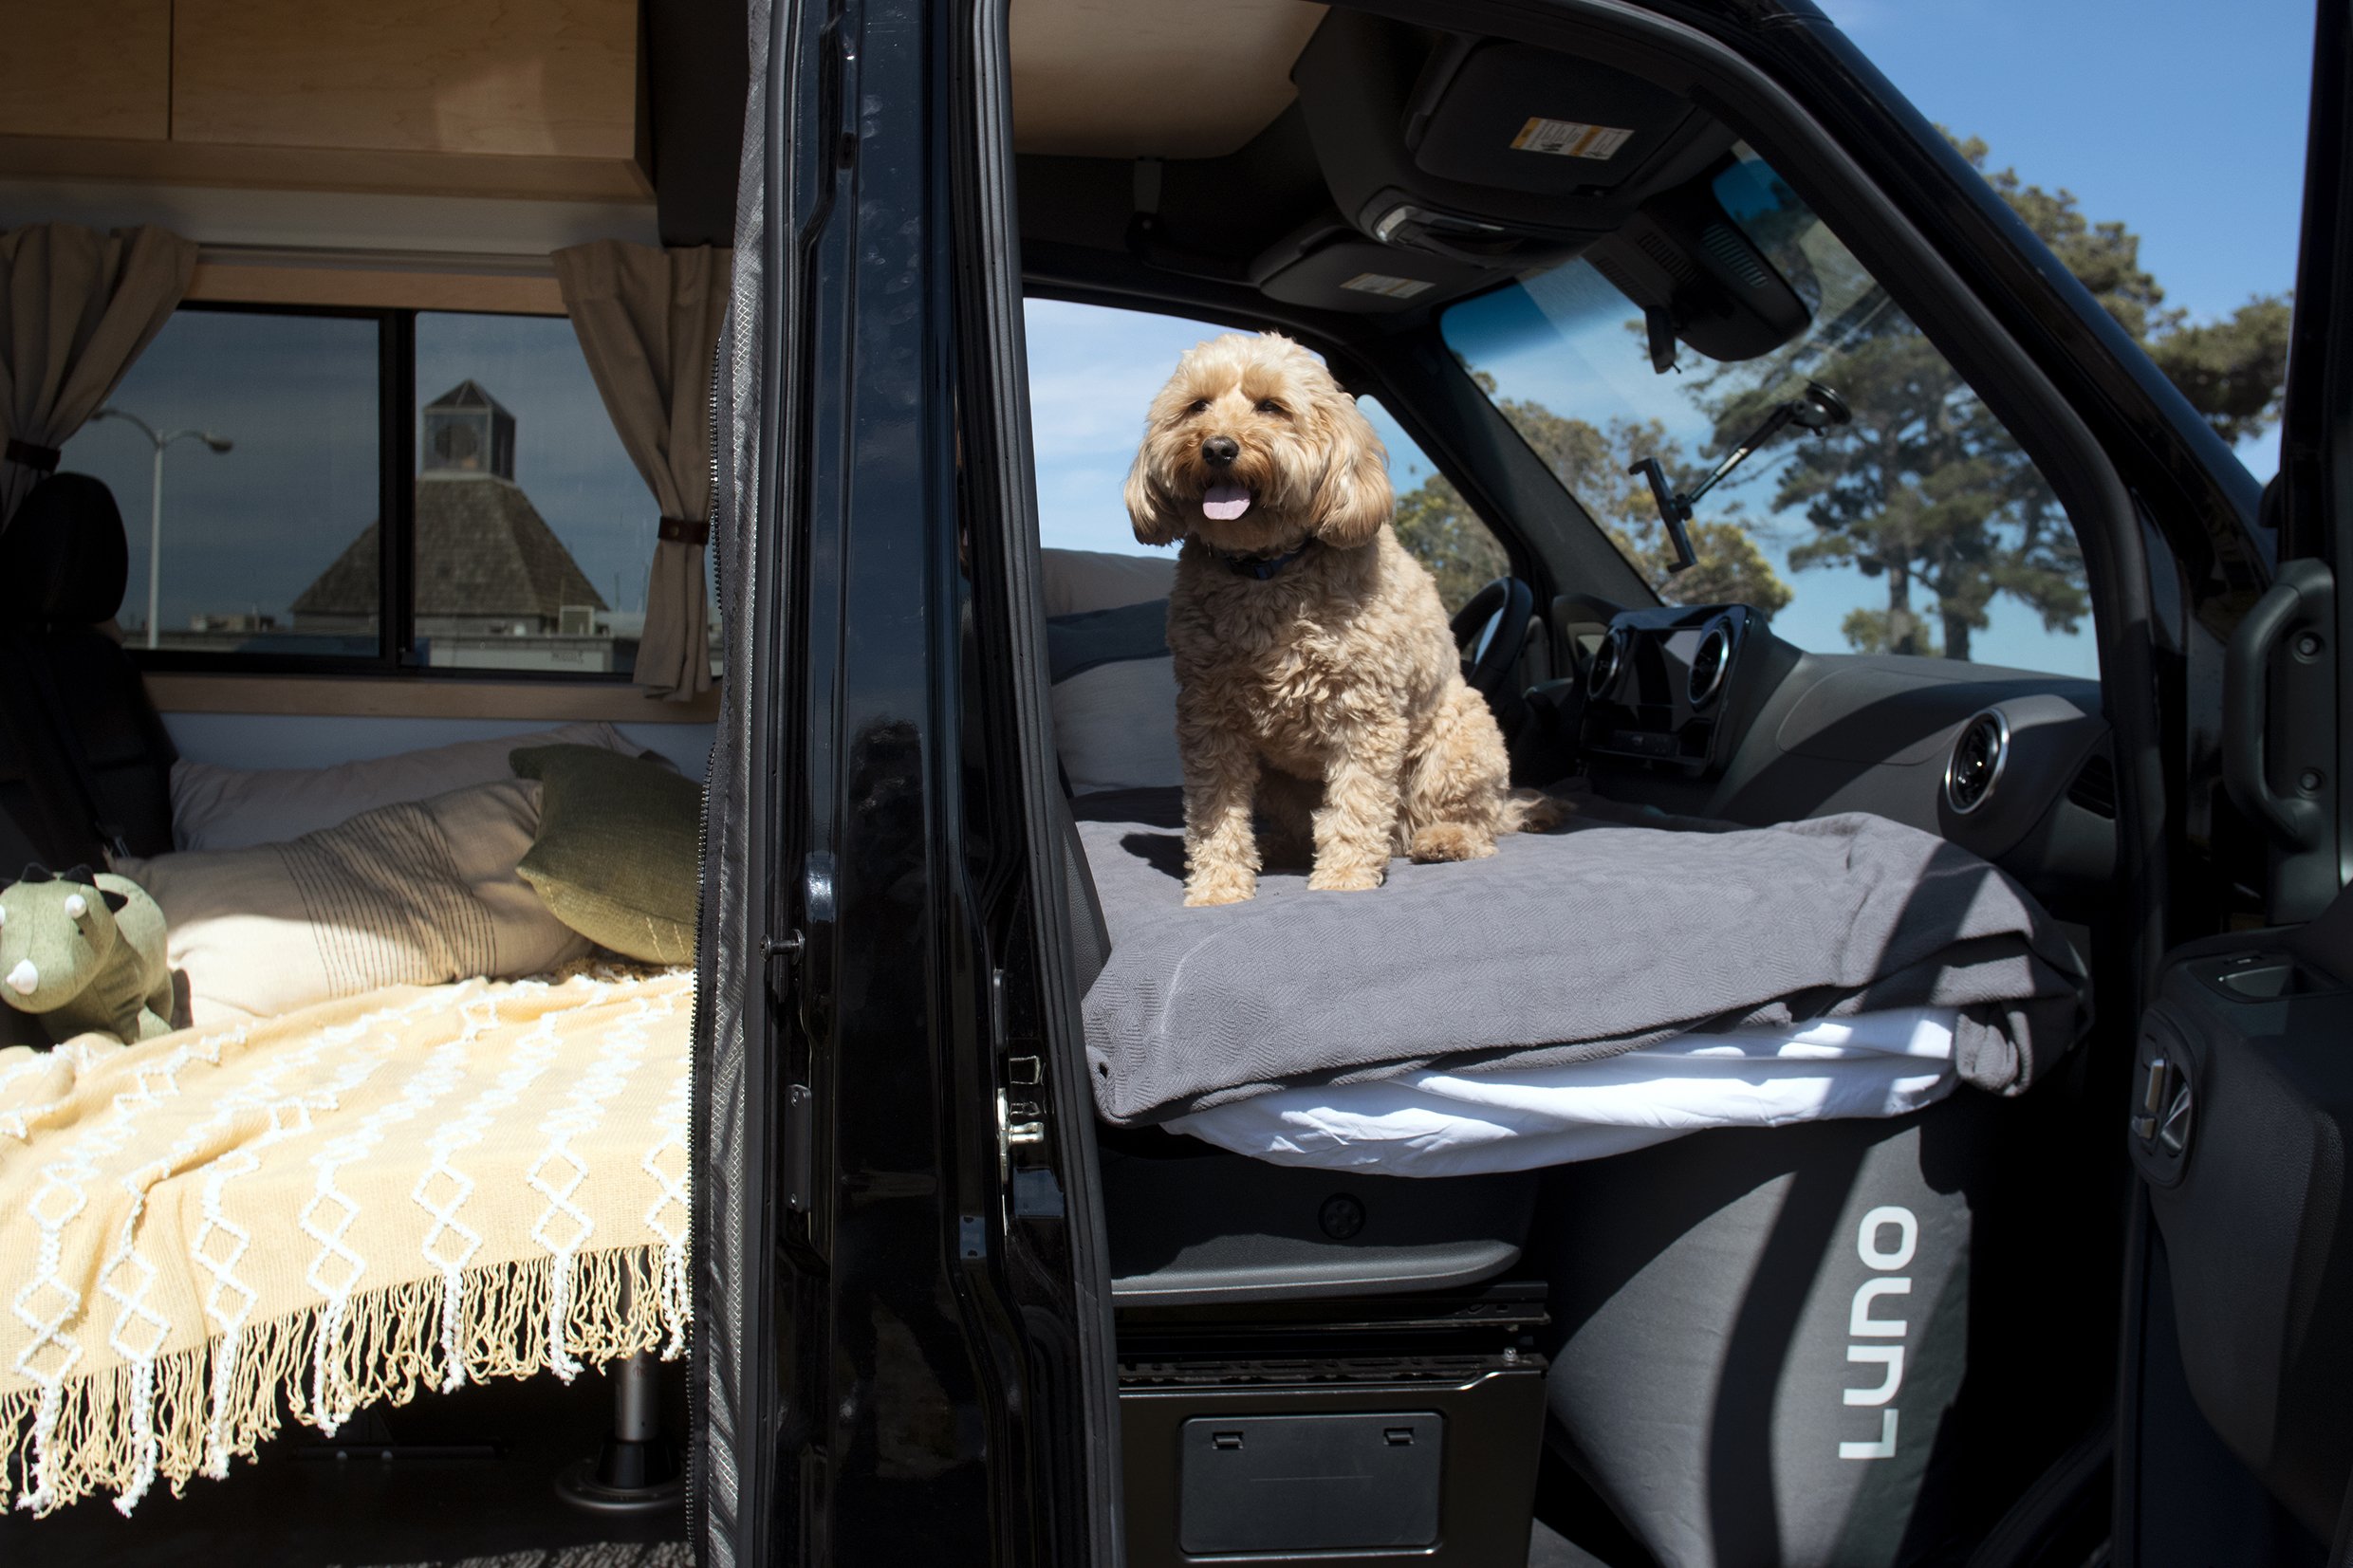
Photo Credit: Muse & Co. Outdoors
Other Tips and Tricks for Traveling in a Campervan With a Dog
Bringing the right gear and camping in dog-friendly locations will go a long way towards making your campervan travels with your dog fun and relaxing.
Still, there are also some tips and tricks to keep in mind which can help out when you bring your pup on the road:
Bring Vaccination Records
Believe it or not, some campgrounds and RV parks require hard copies of your dog’s vaccination records to permit them to enter.
Vaccination records are also required when crossing national borders, so keep that in mind if you plan on traveling to Canada, Mexico, or beyond.
Keep a copy of these records in your van with your other papers like registration and insurance information.
Pick a Food You Can Find Anywhere
Dogs can get upset stomachs if you switch their food. If you are traveling for an extended period of time, it’s important to choose a dog food that is available at most pet stores so you can avoid having to suddenly switch your pup’s food.
Use Rover in a Pinch
Rover is a platform that allows you to connect with pet sitters and doggie daycares across the country.
If you’re on an extended road trip and you want to go somewhere without your dog for a few days, Rover is a great way to find reliable sitters for your pup.
Plan Your Van With Your Dog in Mind
Whether you are taking on a DIY van build or looking for a professional van conversion company, make sure to consider your dog when thinking about your ideal van setup.
Things like durable flooring, an open layout, and easily cleanable materials can make van life with a dog much more enjoyable.
Are you looking for a van to travel in with your furry friends? Muse & Co. Outdoors offers Sprinter van conversions in the San Franciso Bay Area of Northern California.
Our vans are semi-customizable and are constructed with the highest quality materials and components. We have builds that are perfect for solo travelers, couples, families, and of course—for those traveling with their pups!
Head to our Build My Van tool to learn more about our vans and explore your options.
What Is a Class B RV? Class B RVs vs. Camper Vans
Photo credit: Muse & Co. Outdoors
Camper vans are more popular today than ever before. There are lots of DIY and professionally built vans on the road, using a variety of vehicle chassis including the Mercedes Sprinter, Ford Transit, and Ram Promaster.
When researching camper vans, you might see many terms floating around for similar-looking vehicles, including “Sprinter van”, “Class B RV”, “Class B motorhome”, “van conversion”, or “Class B camper van”.
All of these vehicles provide a built-in living space on a van chassis that is significantly smaller than other recreational vehicles.
Still, there can be some differences between these terms and it is important to understand what each term means when shopping for a new camper van or small RV.
Definition of a Class B RV
Class B RVs are the smallest type of motorhome. They are vehicles that have been built from the ground up with the intention of being used as recreational vehicles. They include amenities like a dinette, sleeping area, small bathroom, holding tanks for water, and a power system. Usually, Class B RVs are built on high-roof van chassis.
The smaller size of of Class B motorhomes gives them many advantages over the larger classes. They get better gas mileage and are much more capable off-road.
Class B RVs are also better for boondocking, or remote camping away from established campsites. For this purpose, they are usually equipped with solar panels and lithium battery systems so they do not have to rely on hookups.
Though small, Class B RVs are able to include many of the amenities of larger RVs and still have an impressive amount of storage space. Many Class Bs even have a queen-sized bed.
Class B RV vs. Class A or Class C RV
Class B RVs are much smaller than both Class A motorhomes and Class C motorhomes. Class A is the largest size of RV, followed by Class C, with Class B being the smallest.
Class A motorhomes are large, usually between 29 and 45 feet in length, and include many comforts of home including separate bedrooms, full wet baths, and plenty of living space.
Class C motorhomes are a bit of a compromise between Class A and Class B. They have better fuel economy than Class A motorhomes and are more maneuverable, but they lack some of the space and amenities as well.
RVers who want a more fuel-efficient option or who want a type of RV that doesn’t need special storage might opt for a Class B instead of a larger option.
Class B RVs are also great for people who like to get off the beaten path and explore dirt roads and other remote areas. While small, the floor plans of Class B vans still allow for everything needed to live in them full-time.
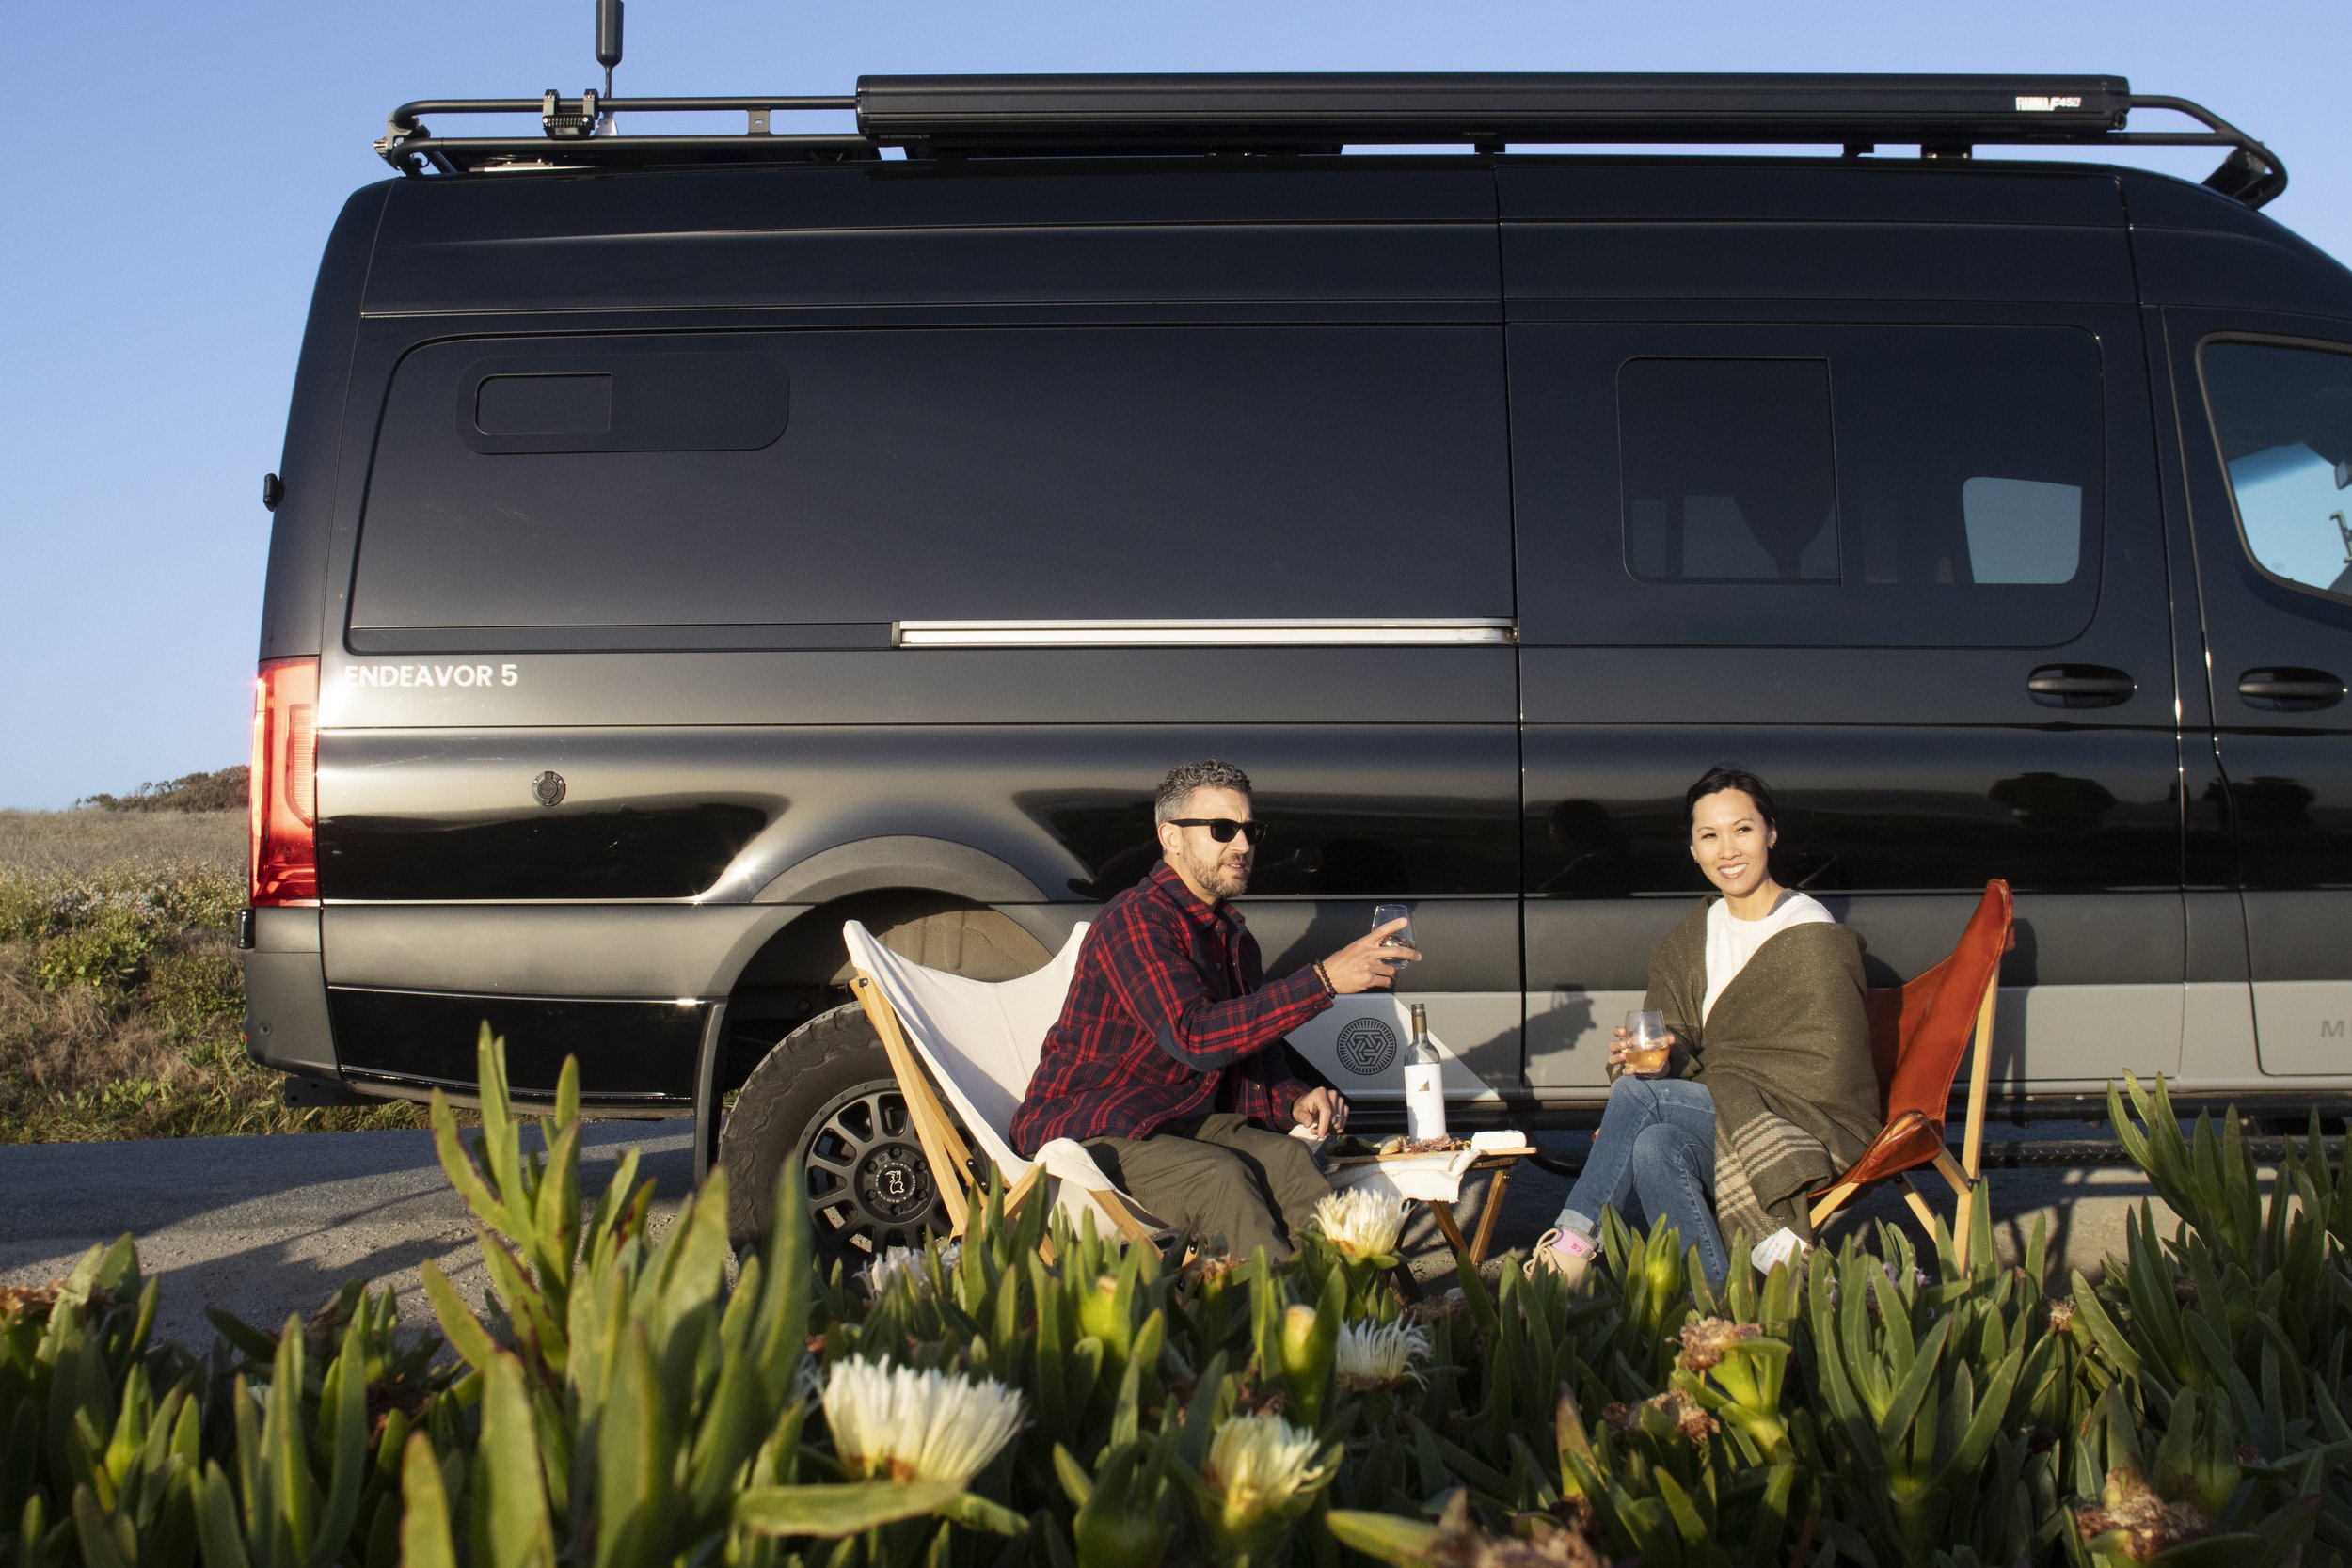
Photo Credit: Muse & Co. Outdoors
What is the Difference Between Class B RVs and Camper Vans?
Class B RVs are built from the ground up for the purpose of being recreational vehicles, while camper vans or “conversion vans” are cargo or passenger vans that are converted into campers.
It can get confusing trying to distinguish between a Class B RV and a camper van, and the truth is, they are very similar. As the RV industry catches on to the #vanlife trend, they are producing and selling more Class B camper vans and fewer larger motor coaches.
RVing culture and that of the van life movement are quite different. While some large RV manufacturers, such as Winnebago, do make Class B RVs that are quite similar to conversion vans, most of these cookie-cutter models lack the character and attention to detail that camper vans are known for.
A great middle ground between a cookie-cutter production “small RV” and a DIY conversion van is to have your Sprinter van professionally built out by a small but reputable van conversion company.
Van conversion companies like Muse & Co. Outdoors bring years of expertise to the table and are able to work closely with their customers to build them their dream camper van.
Whether you are looking for an off-road capable 4×4 rig, a camper van for you and your family, or a luxurious Sprinter van that is more nimble than your current RV, Muse & Co. Outdoors can help you make your van life dreams a reality.
Check out our Build My Van tool to learn more about our models and explore your options!
5 Tips for Keeping Your Camper Van Cool During Summer Van Life
Photo credit: Muse & Co. Outdoors
The summer months can be a great time for camper van road trips, but hot weather can also be challenging when camping.
Keeping cool in a camper van during summer is possible, you just need to know what to do and what gear to bring along.
Whether you’re a full-time van lifer or just looking to get away for a weekend during the hot summer months, use these tips to keep your van cool.
1. Stick to the Mountains and the Coast
The best way to stay cool in a camper van during summer? Avoid hot weather.
If you are planning a summer road trip in your Sprinter van conversion, especially in the western half of the country, choose areas that are high-elevation or near the Pacific coast.
While the rest of the tips in this article can go a long way towards making hot weather travel in your van more comfortable, you are still going to be somewhat exposed to the elements when camping.
Areas along the pacific coast and above 5,000 feet or so in elevation stay significantly cooler during the summer.
f you do have to camp somewhere where the weather is super hot, choosing campsites near water can allow you to at least beat the summer heat by swimming during the hottest hours of the day.
2. Maximize Airflow
For most camper van setups, getting airflow is the best way to keep the inside of your van comfortable on hot days and nights.
The most common way to get airflow in a van build is to add one or two roof vent fans such as the Maxxair fan models. These powered fans work off of your van’s electrical system, which is usually powered by solar panels on the roof.
When the sun is high in the sky during the summer, you should have no problem running your vent fan on high all day and night.
Roof vent fans are designed to push air into the van or pull it out. For sleeping on warm nights, one of the best setups is to open up side windows near your bed and set your roof fan to pull air out of the van. This will create a steady breeze coming in through the windows near your bed.
Van dwellers can also get lots of airflow in their living spaces by keeping the doors open while hanging out inside. Of course, summertime is also mosquito time in many areas of the country, which may discourage van owners from taking this route.
Fortunately, some third-party companies make custom-fit bug screens for Sprinter vans which allow you to have your doors open without allowing pests in.
3. Install an Awning
Sometimes all that is needed to make hot summer days enjoyable is a little sunshade. Awnings that attach to the side of your van or to a roof rack are a great way to extend the living space of your rig and create a nice shady area to enjoy warm weather under.
Depending on the sun angle, deploying your awning can sometimes help shade the van itself, keeping the temperature cooler inside.
Awnings also create a nice area in which you can cook outside, which is likely to be much more appealing on hot evenings that cooking inside of your van.
Photo Credit: Muse & Co. Outdoors
4. Fend Off the Sun
The sun is not your friend in hot climates, which is why it’s important to take steps to keep its heating effects out of your van.
Parking in the shade might be the single most important thing to do to avoid the build-up of hot air inside of your van.
Everyone knows how hot vehicles get when left out in the sun during the summer, and although vans have some protection from the elements such as insulation, the temperature inside will rise quickly if left in the sun.
Aside from parking in the shade, having insulated and reflective window covers is a fantastic way to keep cool air inside of your van.
Window shades that not only reflect the sun’s energy but also help to insulate your van are awesome during both summer and winter.
Several third-party companies sell complete kits for Sprinter vans that cover the front windows and even side and rear windows. These covers have the added benefit of acting as blackout curtains, which is great for people who love to sleep in!
5. Consider an Air Conditioner
People who plan on camping in hot climates frequently might consider adding a rooftop AC unit to their Sprinter van.
Unfortunately, an air conditioning unit that is efficient enough to run reliably off of an off-grid solar electrical setup has still not been developed.
AC units for vans are great for pumping cooler air into your rig when you are hooked up to shore power.
For people who camp at RV parks or who use their van to visit friends and family and park in their driveway, an AC unit can be nice to have in the summer months.
Are you looking for a van for your summer road trips? Muse & Co. Outdoors is one of the best camper van conversion companies in California. We offer semi-custom craftsman van builds for all 2019+ Mercedes Sprinter van models.
Use our Build My Van tool to learn more about our different models and begin your dream van build today!
The 14 Best Campervan Accessories for Van Life in 2022
Photo credit: Muse & Co. Outdoors
The summer months can be a great time for camper van road trips, but hot weather can also be challenging when camping.
Keeping cool in a camper van during summer is possible, you just need to know what to do and what gear to bring along.
Whether you’re a full-time van lifer or just looking to get away for a weekend during the hot summer months, use these tips to keep your van cool.
1. Stick to the Mountains and the Coast
The best way to stay cool in a camper van during summer? Avoid hot weather.
If you are planning a summer road trip in your Sprinter van conversion, especially in the western half of the country, choose areas that are high-elevation or near the Pacific coast.
While the rest of the tips in this article can go a long way towards making hot weather travel in your van more comfortable, you are still going to be somewhat exposed to the elements when camping.
Areas along the pacific coast and above 5,000 feet or so in elevation stay significantly cooler during the summer.
If you do have to camp somewhere where the weather is super hot, choosing campsites near water can allow you to at least beat the summer heat by swimming during the hottest hours of the day.
2. Maximize Airflow
For most camper van setups, getting airflow is the best way to keep the inside of your van comfortable on hot days and nights.
The most common way to get airflow in a van build is to add one or two roof vent fans such as the Maxxair fan models. These powered fans work off of your van’s electrical system, which is usually powered by solar panels on the roof.
When the sun is high in the sky during the summer, you should have no problem running your vent fan on high all day and night.
Roof vent fans are designed to push air into the van or pull it out. For sleeping on warm nights, one of the best setups is to open up side windows near your bed and set your roof fan to pull air out of the van. This will create a steady breeze coming in through the windows near your bed.
Van dwellers can also get lots of airflow in their living spaces by keeping the doors open while hanging out inside. Of course, summertime is also mosquito time in many areas of the country, which may discourage van owners from taking this route.
Fortunately, some third-party companies make custom-fit bug screens for Sprinter vans which allow you to have your doors open without allowing pests in.
3. Install an Awning
Sometimes all that is needed to make hot summer days enjoyable is a little sunshade. Awnings that attach to the side of your van or to a roof rack are a great way to extend the living space of your rig and create a nice shady area to enjoy warm weather under.
Depending on the sun angle, deploying your awning can sometimes help shade the van itself, keeping the temperature cooler inside.
Awnings also create a nice area in which you can cook outside, which is likely to be much more appealing on hot evenings that cooking inside of your van.
Photo Credit: Muse & Co. Outdoors
4. Fend Off the Sun
The sun is not your friend in hot climates, which is why it’s important to take steps to keep its heating effects out of your van.
Parking in the shade might be the single most important thing to do to avoid the build-up of hot air inside of your van.
Everyone knows how hot vehicles get when left out in the sun during the summer, and although vans have some protection from the elements such as insulation, the temperature inside will rise quickly if left in the sun.
Aside from parking in the shade, having insulated and reflective window covers is a fantastic way to keep cool air inside of your van.
Window shades that not only reflect the sun’s energy but also help to insulate your van are awesome during both summer and winter.
Several third-party companies sell complete kits for Sprinter vans that cover the front windows and even side and rear windows. These covers have the added benefit of acting as blackout curtains, which is great for people who love to sleep in!
5. Consider an Air Conditioner
People who plan on camping in hot climates frequently might consider adding a rooftop AC unit to their Sprinter van.
Unfortunately, an air conditioning unit that is efficient enough to run reliably off of an off-grid solar electrical setup has still not been developed.
AC units for vans are great for pumping cooler air into your rig when you are hooked up to shore power.
For people who camp at RV parks or who use their van to visit friends and family and park in their driveway, an AC unit can be nice to have in the summer months.
Are you looking for a van for your summer road trips? Muse & Co. Outdoors is one of the best camper van conversion companies in California. We offer semi-custom craftsman van builds for all 2019+ Mercedes Sprinter van models.
Use our Build My Van tool to learn more about our different models and begin your dream van build today!
5 Easy Meal Ideas for Campervan Cooking
Photo credit: Muse & Co. Outdoors
One of the best parts about van life as opposed to camping is that you can easily make good food by using your campervan kitchen.
While cooking in a van is much better than eating camping food, you will still want to make simple meals that do not require an oven, fancy appliances, or too much clean-up.
Campervan meals can be delicious and healthy while also being easy and quick to prepare and clean up.
Use these awesome camping recipes on your next campervan road trip to eat great food without the hassle or the mess.
Overnight Oats
Looking for easy and delicious breakfast ideas to use while you’re on a van life road trip?
Look no further than these amazing overnight oats, which require no cooking and can be pulled out of the fridge and enjoyed the next day.
Because the oats soak overnight, you don’t have to cook them or deal with the sticky mess of a pot of oats.
You can make a large batch of these overnight oats, or make individual servings in mason jars or any sealable container. The individual servings are nice because everyone can customize their morning oats with toppings as they wish!
These overnight oats are one of our favorite campervan recipes because they provide a healthy meal in the morning without any hassle or difficult clean-up!
The portions in this recipe are for one serving of overnight oats.
Ingredients:
- 1/2 cup old-fashioned rolled oats
- 1/2 cup milk of choice (dairy, almond, soy, etc.)
- 1 teaspoon chia seeds
- 2 tbsp maple syrup
- serving suggestions: fresh or dried fruit, nuts, peanut or almond butter, granola, dried shredded coconut, protein powder
Method:
- Add the oats, milk, chia seeds, and maple syrup to a one-pint mason jar or similar container and stir them until combined. Refrigerate overnight for at least 5 hours.
- In the morning, add additional liquid if desired and top with fruit, nuts, nut butter, or whatever you desire!
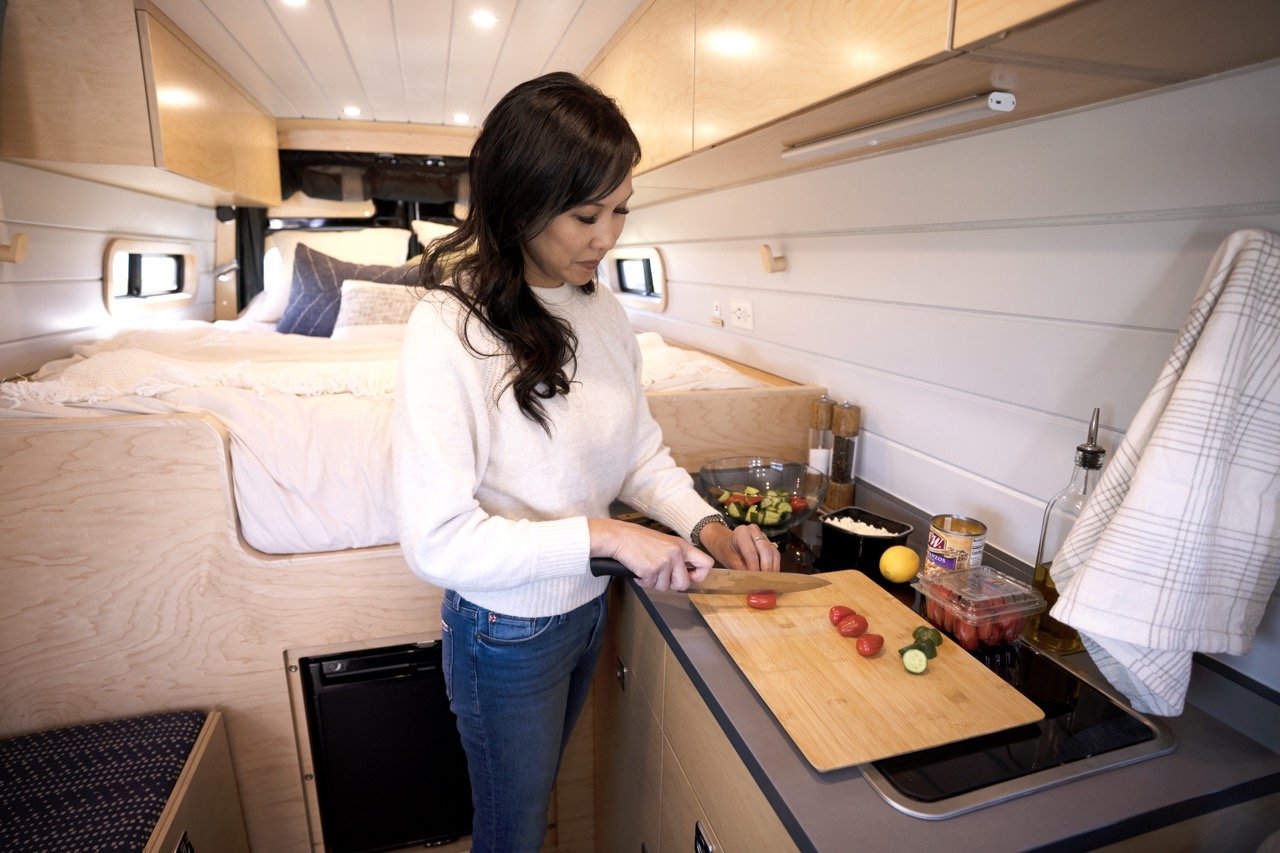
Photo Credit: Muse & Co. Outdoors
Breakfast Tacos
Everyone loves a good breakfast burrito, but breakfast tacos are just as delicious!
This is a great hearty camping meal that is versatile and easy to prepare.
Because the tacos are topped with a fried egg, you won’t have to clean a super dirty frying pan after making scrambled eggs.
The veggie suggestions here are just that, suggestions! Feel free to add whatever is in the fridge and if you would like to add sausage or bacon, go for it!
This recipe makes four breakfast tacos.
Ingredients:
- Taco-sized tortillas of choice
- 3 tbsp olive oil
- 2 tbsp butter
- One medium onion, diced
- One large potato, diced into 1/4 to 1/2-inch cubes
- One bell pepper, color of choice
- One can of black beans, drained
- Shredded cheese
- 4 eggs
- Salt and pepper to taste
- Hot sauce, salsa, sour cream, avocado (all optional toppings)
Method:
- Add the olive oil to a frying pan and heat over medium-high heat. Add the vegetables and sauté until potatoes are tender, 15-20 minutes. Season with salt and black pepper, to taste. You can use a lid to decrease the cooking time, if desired. When the veggies are done, add the black beans and stir until incorporated and warmed.
- Remove the vegetables and beans from the pan and set aside in a bowl. Add butter to the pan and reduce heat to medium-low. Add eggs and cook to desired doneness (we like over-easy).
- Add a large pinch of shredded cheese to each tortilla. Add veggie/bean mixture. Top each taco with a fried egg and any additional desired toppings. Enjoy!
One-Pot Coconut Veggie Curry
When you are glamping in a Sprinter van, you don’t have to settle for hodge-podge dinners. This one-pot coconut veggie curry is a delicious and healthy meal that you can make easily during van camping trips.
The curry also saves in the fridge quite well for several days, so feel free to make a large batch and eat it for lunches during the week that follows.
This curry is best served over rice or quinoa, but even couscous will work in a pinch.
There are few veggies that will not work in this recipe, so feel free to improvise if you have some other things in the fridge.
If you want more protein in the dish, chicken breast works well. For a veg option, try adding a can of chickpeas.
This recipe makes 3-4 servings.
Ingredients:
- 2 tbsp coconut oil (olive is also fine)
- 1 yellow onion, diced
- Small 3/4 inch cube of ginger, minced
- 3 cloves of garlic, minced
- 1 head of broccoli, cut into 1 1/2 inch pieces
- 1 head of cauliflower, cut into 1 1/2 inch pieces
- 1 yellow onion, diced
- 1 carrot, thinly sliced
- 1 1/2 cups snow peas, ends removed
- 1 tbsp curry powder, plus more to taste (or paste such as thai red curry paste, if preferred)
- 1 can of coconut milk
- 1 cube of vegetable bouillon
- Salt and black pepper to taste
- Cayenne pepper (optional)
- Cashews and/or cilantro, for garnish (optional)
Method:
- Heat oil in a large pot over medium heat. Add onion, garlic, and ginger and cook, stirring frequently, until onion is translucent, about 6 minutes.
- Add carrot, broccoli, cauliflower, and peas and cook for 6-8 minutes, or until softened slightly.
- Add curry powder or paste and stir until the vegetables are coated. Add coconut milk and crumble in the bouillon cube. Add cayenne pepper, if desired. Bring to a simmer and reduce heat to low, stirring occasionally. Cook until vegetables are tender, around 10 minutes.
- Serve over grain of choice. Top with cashews and cilantro, if desired.
Elevated Ramen
Ramen has long been a staple of camping food, and it’s easy to see why. Ramen is cheap, super easy to make (you just have to add hot water), and cooks in minutes.
But since everything is elevated when camping in a Sprinter van, why not elevate your ramen, too?
Fancy ramen is simple: You make your favorite ramen, and add in some vegetables and a soft-boiled egg to take this simple snack and turn it into a full-blown meal!
This recipe is for 1 serving of ramen, but can easily be multiplied for more people!
Ingredients:
- 1 pack of your favorite instant ramen
- 1 egg
- 2 tbsp cooking oil
- 2 heads of baby bok choy
- 4 oz crimini mushrooms
- Small (about 3/4 inch) cube of ginger, peeled and minced
- 1 clove garlic, minced
- Salt and pepper, to taste
- 3 green onions, finely chopped
- Cilantro for garnish, finely chopped
- Roasted peanuts for garnish
- Sriracha (optional)
Method:
- Bring about 2 cups of water to boil in a small pot. Add the egg with the shell on, being careful not to break it when placing it in the pot. Set a timer for 7 minutes.
- While the egg is cooking, heat the oil in a pan over medium heat. Add the bok choy, mushrooms, garlic, and ginger and cook until tender, about 5-7 minutes. Add salt and pepper to taste, but remember that ramen is quite salty.
- When the timer goes off, remove the egg with a slotted spoon and run some cold water over it. Set aside.
- Add your ramen to the boiling water and cook according to the instructions on the packet before transferring to a bowl.
- Crack the egg several times by tapping it on the countertop. Remove the peel carefully and place the egg on top of the ramen.
- Add your veggies and garnishes to the ramen. Enjoy!
Fancy Mac and Cheese
Fancy mac and cheese follows the same process as the elevated ramen recipe. You will prepare your favorite boxed mac and cheese, and add in some veggies and sausage to really take it to the next level and make it a full meal!
This recipe is easy to prepare, requires minimal cleanup, and really hits the spot after a long day spent exploring.
You can always skip the sausage or opt for a vegetarian sausage option if you don’t eat meat.
This recipe is also quite versatile and most veggies will work. You can even substitute another sausage or hot dogs if you’d like.
This recipe serves 2 people, though hungry campers have certainly been known to eat an entire box of mac and cheese in one sitting!
Ingredients:
- 1 box of your favorite mac and cheese (we like Annie’s organic real aged cheddar)
- 1 tbsp cooking oil
- 1 half of a red onion, sliced
- 1 small head of broccoli, cut into 1 1/2 inch pieces
- 6 oz crimini mushrooms, sliced
- 2 fully-cooked chicken apple sausages
- Salt and pepper, to taste
- Milk and/or butter, as required by mac and cheese instructions
Method:
- Boil some water and prepare your mac and cheese according to instructions.
- While water is boiling and pasta is cooking, heat the oil in a frying pan over medium-high heat. Add your vegetables and sausage and stir fry until broccoli is tender, stirring occasionally, about 10 minutes. Add salt and pepper to taste.
- Place your prepared mac and cheese in bowls. Add vegetable/sausage mix and stir. It’s that easy!
Are you looking for a decked-out Sprinter van to enjoy some delicious meals from on the road? Look no further than Muse & Co. Outdoors, California’s top Sprinter van conversion company.
Muse & Co. Outdoors builds semi-customizable luxury Sprinter van conversions for solo travelers, couples, and families looking to try the van life.
We use the highest-quality sustainable materials throughout our builds to ensure that our vans are not only comfortable and beautiful but also rugged and durable.
Check out our Build My Van tool to learn more about our different models and visualize your dream rig!
8 Campervan Storage Ideas to Declutter Your Van Life
Camper vans are a small space, which is a big part of why they are loved by so many.
Maneuverability, off-road capability, and great gas mileage are just a few of the perks that come with having such a compact rig.
But as any van lifer knows, having such a small living space requires some creative solutions when it comes to storage and organization.
Use these campervan storage hacks to declutter your motorhome or Sprinter van, free up extra space for large and small items, and make your road trips more enjoyable.
1. BedSlide
Bedslides are heavy-duty sliding platforms that are designed for use in pickup truck beds.
They are a little-known but amazingly effective way to maximize storage space in campervan conversions.
Bedslides can be installed under the bed in the ‘garage’ area in the rear of a van to provide easy access to storage boxes and other items that would otherwise be hard to reach.
Instead of having to crawl into the garage area to pull out gear and storage containers towards the front, a Bedslide allows any items under the bed to be accessed easily while standing at the rear doors.
2. Roof Rack
A roof rack can provide extra storage for items large and small in vans where there is just not enough space for all the gear you want to bring.
Roof racks are commonly used to carry large items that would not fit inside of the van, such as kayaks, surfboards, and paddleboards. They’re also great for mounting accessories like solar panels and awnings.
Camper van roof racks can also hold one or more cargo boxes, providing extra space to stow skis and other gear.
3. Magnetic Strips
Magnetic strips are typically used to hold knives in a home, but they can be used as a hanger for any small metal items in a van. Cooking utensils, clips, and many other small items can be easily organized and stored using magnetic strips.Though many van owners have had success with this storage solution, we have to note that it could be potentially dangerous in the case of an accident!
4. Hanging Shoe Rack
Hanging shoe racks have become a favorite storage solution among camper van owners. The racks can provide hanging storage and can be mounted on doors or on the backs of seats.You don’t have to use the racks for just shoes—anything from toiletries to cleaning supplies can be stored in the convenient pockets. If the racks aren’t being used, they are completely collapsible so you can stow them away without taking up much room in the van.
5. Fruit & Veggie Hammock
Looking for kitchen storage solutions that are both cute and great for freeing up cabinet space?Look no further than these awesome fruit and veggie hammocks available on Amazon, which can be easily hung from overhead kitchen cabinets.These little hammocks not only keep your produce from being jostled around on bumpy roads; they also free up campervan kitchen cabinet space and valuable countertop space.
6. Space Saver Bags
Space saver bags are a seriously genius campervan storage solution. Sleeping bags, extra bedding, or clothing for different seasons are all excellent candidates for the use of these little vacuum-sealing bags.The bags work by allowing air out when you squeeze them, without allowing any air in. They can be compressed to nearly half their original size to store any soft goods that take up space in your van.
7. Coat Hooks
Coat hooks are one of the most helpful and easiest to implement campervan storage hacks. Some hooks use velcro or a sticky backing to mount, while others need to be screwed in.Coat hooks allow you to hang clothing, keys, and anything else you can think of so these items are easily accessible and out of the way.
8. Paper Towel Holder
Paper towels might not be the most eco-friendly way to clean up a mess, but they certainly come in handy when traveling in a van.Keeping your paper towels accessible but out of the way is easy with a paper towel holder. They can be mounted under overhead cabinets, inside the door of lower kitchen cabinets, or even on the wall behind your counter space.
9. Over-the-Cabinet Trash Cans
A trash can is a necessity in every camper van, but a traditional one will take up a huge amount of space inside of your kitchen cabinet.One great solution is to buy an over-the-cabinet trash can that can hook over a cabinet door to stow away out of sight and without taking up much cabinet space.
Of course, the best way to keep a campervan organized is to design a well-functioning layout with plenty of storage space.
Muse & Co. Outdoors builds Sprinter van conversions with thoughtful storage solutions that make it simple to bring along everyone’s gear for an extended road trip.
Whether you are looking into living full-time van life or just want a weekend getaway rig for you and the family, Muse & Co. Outdoors has a camper van that will fit your needs.
Check out our Build My Van tool to learn more about our models and explore your options for customization!
The 6 Best Campervan Accessories to Make Van Life Even Better
One thing we can all agree on about van life: It’s awesome. There’s just no better feeling than hitting the road in a self-contained home on wheels, waking up in your favorite places on earth, and resting comfortably after long days spent outside. But just because something is great, doesn’t mean it can’t get better!
That’s why we put together this list of some of our favorite gadgets and gear for camper van owners. These items can elevate your camping trips, making life easier and more fun on the road. The difference between a good trip and a great one may just come down to the gadgets that make their way onto your packing list!
1. Carbon Monoxide Detector
To relax and fully enjoy your camper van road trip, peace of mind is a must. That’s why certain safety features, such as a carbon monoxide detector, are on our list of the most useful campervan gadgets. Any appliance that involves combustion, such as a propane cooktop, camping stove, or diesel heater, can emit deadly carbon monoxide.
Carbon monoxide is odorless and colorless, meaning you likely wouldn’t even know you were being exposed to it until it was too late. That’s why a carbon monoxide detector is an absolute essential for camper vans. It will sound a loud alarm if carbon monoxide levels become dangerously high in your van. Every Muse & Co. Outdoors camper van comes equipped with one, so you can sleep easy and enjoy your trip.
2. Collapsible Camping Chairs
Having a comfortable place to hang out inside is part of what makes camper vans so great. But if the weather is nice, you’ll probably find yourself wanting to enjoy the fresh air at your campsite. That’s why having camp chairs handy is so important.
Collapsible camping chairs are a great choice for van owners because they are lightweight and, most importantly, take up very little space inside of your van when not in use. They’re small and light enough to put in a backpack and carry to the beach, and they’re built with outdoor use in mind for ruggedness and durability.
3. Bluetooth Speaker
What’s the only thing that can make hanging out with friends and family at your favorite camp spot even better? Your favorite music! Rechargeable Bluetooth speakers have become extremely popular in recent years, and it’s easy to understand why. These little boomboxes can pump out impressive sound, have great battery life, and are water and drop-resistant – making them a great choice for van lifers.
Perhaps the best feature of portable Bluetooth speakers such as the JBL Flip 4 is that you can set them anywhere in your van or around your campsite, and control the music from your phone. This allows you to maximize the acoustics without leaving your chair to change the song. If your speaker runs out of battery during your trip, you can charge it using one of your van’s USB ports.
To charge your speaker wherever you go, you’ll need an off-grid power system, complete with solar panels, leisure batteries, and an inverter. Having a power inverter hooked up to an adequate power bank gives you portable power wherever your van travels, so you can charge items like speakers, phones and ipads, kindles, headlamps, and any other small electronics that have a charger, without having to hook them up to your vehicle’s cigarette lighter.
4. Mini Broom and Dustpan
Some of the best camper van gadgets can also be some of the least glamorous. When it comes to improving life on the road, keeping your van clean is one of the easiest things you can do. Any experienced van lifer knows how quickly the floor of the van gets covered with dirt and sand constantly being tracked in from outside.
Fortunately, although camper vans get messy quickly, they are also a breeze to clean. We feel that this mini broom and dustpan set is an essential campervan gadget because it looks great, works well, and takes up very little room when not in use. For a deeper clean, having a portable handheld vacuum cleaner can be nice, but this broom set takes care of a dirty camper van floor in no time.
5. Collapsible Tupperware
Camper van owners and people living full-time van life are always looking for ways to save storage space. This collapsible food storage set is a lifesaver when it comes to maximizing the small spaces inside of your cabinets.
The containers collapse to a fraction of their original size so they can stow away and be a space saving dream while not in use!
6. Spikeball Kit
If you haven’t played Spikeball yet, you are seriously missing out. This game has been an instant hit among kids and adults alike, and it’s easy to tell why. Spikeball can be played just about anywhere you can find a flat clearing outside (including most campsites and wild camping areas).
One great thing about this Spikeball set is its portability. It includes everything you need to play, including a net with collapsible legs and 3 balls, all of which pack into the included compact carry bag so it doesn’t take up too much living space.
You can set up Spikeball in your campsite, or easily take it to the beach or any grassy area for hours of fun and entertainment.
Of course, no amount of gear, gadgets, or travel tips can turn a poorly-built camper van into one that is efficiently designed and user-friendly. Here at Muse & Co. Outdoors, we draw from our team’s decades of combined design and build experience to craft truly state-of-the-art Sprinter camper vans that make traveling easy, fun, and stylish. Use our Build My Van tool today to begin the process of building your dream rig!

Spikeball Kit
If you haven’t played Spikeball yet, you are seriously missing out. This game has been an instant hit among kids and adults alike, and it’s easy to tell why. Spikeball can be played just about anywhere you can find a flat clearing outside (including most campsites).
One great thing about this Spikeball set is its portability. It includes everything you need to play, including a net with collapsible legs and 3 balls, all of which pack into the included compact backpack. You can set up Spikeball in your campsite, or easily take it to the beach or any grassy area for hours of fun and entertainment.
Of course, no amount of gear, gadgets, or games can turn a poorly-built camper van into one that is efficiently designed and user-friendly. Here at Muse & Co. Outdoors, we draw from our team’s decades of combined design and build experience to craft truly state-of-the-art Sprinter camper vans that make traveling easy, fun, and stylish. Use our Build My Van tool today to begin the process of building your dream rig!
Are Camper Vans a Good Investment?
When custom-built Sprinter van conversions were first becoming popular, the appeal was all about ‘quality over quantity’. In contrast to the prevailing RV’ers mindset of “how big and how much can we fit into a box on wheels”, the #vanlife movement in its early days was all about maintaining essential comforts without sacrificing build quality, all in a much smaller, more reliable, and more capable vehicle.
As Sprinter van conversions became popular, countless companies looked to capitalize on the hot new market–including not only new camper van conversion companies, but also automakers like that mimicked the Mercedes Sprinter high-top design with vans like the Ford Transit and Ram Promaster.
Today, while some builders stand out for their know-how and commitment to craftsmanship, others have looked to prioritize profit over all else by following the RV model of cheap materials, quick and dirty building practices, and low-quality components. Some others attempt DIY van builds, not understanding that their value will not hold down the line.
If you are in the market for a van conversion, the choice is yours: Go with one of the few builders in the camper van community who can truly offer precision-engineered, hand-crafted quality, or opt for a cookie-cutter, cheaply-built van or Class B motorhome that may come with a lower initial price point.
You’ll also need to choose between the different van platforms, of which the Mercedes Sprinter is the clear-cut top choice for reliability and quality.
If you are looking for a campervan for yourself or your family that will have minimal depreciation over the next several years, you need to understand what factors into how a camper van will hold its value over time. Keep reading to learn what factors into camper van depreciation.
The Van Itself: Mercedes Sprinters Hold Their Value
Today, there are several options for high-roof cargo vans that can be converted into campers. Despite the competition, the Mercedes-Benz Sprinter remains the industry standard for these vehicles, setting the bar for reliability, performance, and features.
Unsurprisingly, Sprinters also hold their value extremely well when compared with other vans. Purchasing any new vehicle with excellent resale value is a great security blanket for your investment, should you need or want to sell it in the future.
Vehicle reliability is the driving factor of resale value. The more reliable a car, the longer it will hold its value (see: Toyota Tacoma). With their powerful and efficient diesel engines, Mercedes Sprinter vans are known to go upwards of 500,000 miles on the original engine and transmission! This allows used camper vans built on the Sprinter platform with relatively high miles to be sold for much more than competing vans of the same age and mileage.
Mercedes is also ahead of the curve when it comes to premium safety and comfort features. As these features become standard in more vehicles, future van buyers will be looking for them when purchasing used vehicles. Investing in a Mercedes Sprinter van means you will have a vehicle that will meet industry standards in the coming years, should you want to sell it.

The Van Build: Why Craftsmanship Matters
The type of campervan is an important factor in resale value, but so is the build itself.All Sprinter van build-outs are certainly not created equal.
While a professional conversion is almost certain to add value to your van, you’re also certain to pay more upfront for it; if you are going to make the investment in a professional build-out, you should be sure to choose a company that offers true craftsman quality.
Sprinter vans are a tough environment to build in, not only because of the curvature and irregularities of the van’s interior, but also because the build will be exposed to vibration, rocking, and all the bumps of the road. For a van conversion to maintain its structural integrity and functionality over the years, it is essential that premium materials are used throughout, and that the build team is capable of precision engineering and hand-crafted quality.
Building a quality camper van interior takes a lot of time. Many van conversion companies are looking to cut costs and cut corners in their build process in order to maximize profits.
Particle-board cabinetry, cheap components that are prone to breaking, and poor craftsmanship are commonly found in modern van conversions, even those from many name-brand companies! While the van may, at first, look and function similarly to a premium-quality build, time will always be the true test of a van conversion’s class and value.
If you are looking for a California Sprinter van conversion company that does not compromise on quality, look no further than Muse & Co. Outdoors. Muse & Co. Outdoors is a premium camper van outfitter located in the heart of the San Francisco Bay Area.
With decades of combined design and build experience, our team is crafting artisan camper vans using superior components and premium environmentally-friendly materials. Our layouts are thoughtful and intuitive, providing ultimate comfort without compromising on aesthetics or quality. Whether you are a first time camper van buyer or someone who lives full-time in your van and is looking for an upgrade, our builds offer the perfect balance between luxury and performance.
With a 15-year background of creating immersive spaces for some of the world’s most notable commercial buildings, the team at Muse & Co. Outdoors brings a unique skillset and experience to the camper van conversion market. Our level of expertise shines through in our van conversions, which are as durable and capable as they are beautiful, and don’t come with the downsides of larger van builders. Investing in a quality off-grid capable rig like those we offer is the best way to ensure that your Sprinter van holds its value for years to come.
Sprinter 144 vs. 170: What Size Sprinter Van is Best for a Camper Van Conversion?
Photo by Muse & Co. Outdoors
What Does Wheelbase Mean?
Sprinters are cargo vans that come in three different “wheelbases”. The wheelbase of a vehicle is simply the distance between the two axles. The Sprinter van is available in:
- 144” WB
- 170” WB
- 170” Extended WB
While the Sprinter 170 and the 170Ext vans technically have the same wheelbase, the extended version offers an additional 15 inches of nterior length for your build out. The body of the van ‘extends’ farther back past the rear wheels, which is what creates the extra length of the van.
Parking and Maneuverability
When it comes to parking and maneuverability in tight spaces, it should come as no surprise that the 144” wheelbase Sprinter van holds the advantage. This wheelbase has a tighter turning radius, and it fits easily in standard parking spaces found in most parking lots.
However, the 170” WB Sprinter van is plenty nimble. The van does (barely) fit in standard parking spots, and, like all Sprinters, was designed with city driving in mind. Compared to a traditional RV, a 170” Sprinter is far and away the more nimble vehicle. The narrow profile of the Sprinter, combined with its safety features and moderate size, allow it to navigate city streets with ease.
Unless you do a lot of city driving and you plan on using your Sprinter van as your daily driver, parking and drivability shouldn’t be too much of a factor when choosing a wheelbase for your van.
Living Space in Your Camper Van
This one is pretty simple. The longer the wheelbase of your camper van, the more buildable living space there will be inside for your floor plan. The difference in interior space between a 144” and 170” extended wheelbase Sprinter may seem inconsequential at first, but it’s quite a big gap in reality.

Photo by Muse & Co. Outdoors
But there are some important considerations to take into account when choosing a length for your adventure van. First, if you have kids or want more than two seats in the van, a 170” WB Sprinter is almost always the best van.
Next, consider how important a full-length bed is to you. Full-length beds do not fit horizontally in Sprinter vans; they must be oriented front to back. In a shorter wheelbase 144” Sprinter, having a full-length bed oriented front to back means that the rest of your living space will be very limited.
The 144” offers about 10.5 feet of buildable space, front to back, so a full-length bed leaves you with about 4 feet of buildable space. A 170, meanwhile, has about 14 feet of buildable space, making a full-length bed the easy choice.
Finally, simply consider your typical usage of the van, and what you personally need to be comfortable. Everyone is different, while some people need the extra space, the smaller 144” wheelbase will be plenty of room for others.
Additionally, if you are planning on living in your van full-time, you might want to consider going with more living space.
Off-Road Capability
Sprinter vans are popular, in large part, due to their off-road capabilities. These vans come with optional 4×4 and suspension upgrades for added clearance and control in off-road environments. The off-road capability of Sprinter vans allows their drivers to access tucked away campsites and mountain bike trailheads that simply aren’t accessible in other types of recreational vehicles.
For light to moderate trail use, all sizes of Sprinter camper vans should perform fine, especially when equipped with 4×4. However, if you plan to use your van in situations where substantial ground clearance and/or a high amount of maneuverability is needed, you may want to consider sticking with the 144” wheelbase van.
The shorter the wheelbase, the less likely it is that you will encounter issues with ground clearance when driving off-road. Plus, if you encounter tight turns with trees or other obstacles on the sides of the road, the 144” will be easier to safely maneuver.
Which Wheelbase Sprinter Van is Best for Camper Van #Vanlife?
You’ll have to consider your personal needs and desires when choosing the specs of your Sprinter van. If you want a more maneuverable, highly off-road capable rig, a 144” might be right for you. On the other hand, if you plan on traveling with more than one passenger, or want more luxury and comfort in your van, the 170” Sprinter is probably the right call.
Muse & Co. Outdoors currently offers three models of camper van – in Mercedes’ 170” and 144” wheelbase Sprinter.